1. What is Two-factor Authentication? How to Choose Based on Your Usage Habits?
What is Two-factor Authentication?
To address recent email security risks and enhance the security of the mail system, Zhejiang University Email System has now enabled two-factor authentication and client-specific password functionality. Two-factor authentication is an additional identity verification method added after you access https://mail.zju.edu.cn via browser, significantly improving account security.
Note:
- If your account has mandatory two-factor authentication activated but not configured, log in at https://mail.zju.edu.cn to be directed to the setup page. Please refer to this article to complete the setup.
- Password usage after enabling two-factor authentication:
- Email Client (e.g., Foxmail, Outlook, built‑in email Apps on phones/computers, etc.): must use client‑specific password to log in;
- Web (https://mail.zju.edu.cn): use your original custom password along with the second verification to log in.
Choosing Verification Methods for Different Usage Scenarios
Using Browser Only
Only need to enable two-factor authentication, no need to set up client-specific passwords. Currently, four verification methods are available: SMS, WeChat, ZJU DingTalk, and External OTP.
Setup 2FAUsing Email Clients
Need to complete two-factor authentication setup first, then set up client-specific passwords. Passwords used for web login and client login will be independent of each other, providing higher security.
Setup Client PasswordMultiple Users or Overseas Use
External OTP App verification is recommended. It's not restricted by region, supports multiple simultaneous users, and is more suitable for work emails or overseas access.
Setup OTP2. How to Setup Two-factor Authentication?
To set up two-factor authentication, please log in to Zhejiang University Email System (https://mail.zju.edu.cn) via browser, click 「Settings」→「Security」→「Two-factor authentication」, then select and bind verification method.
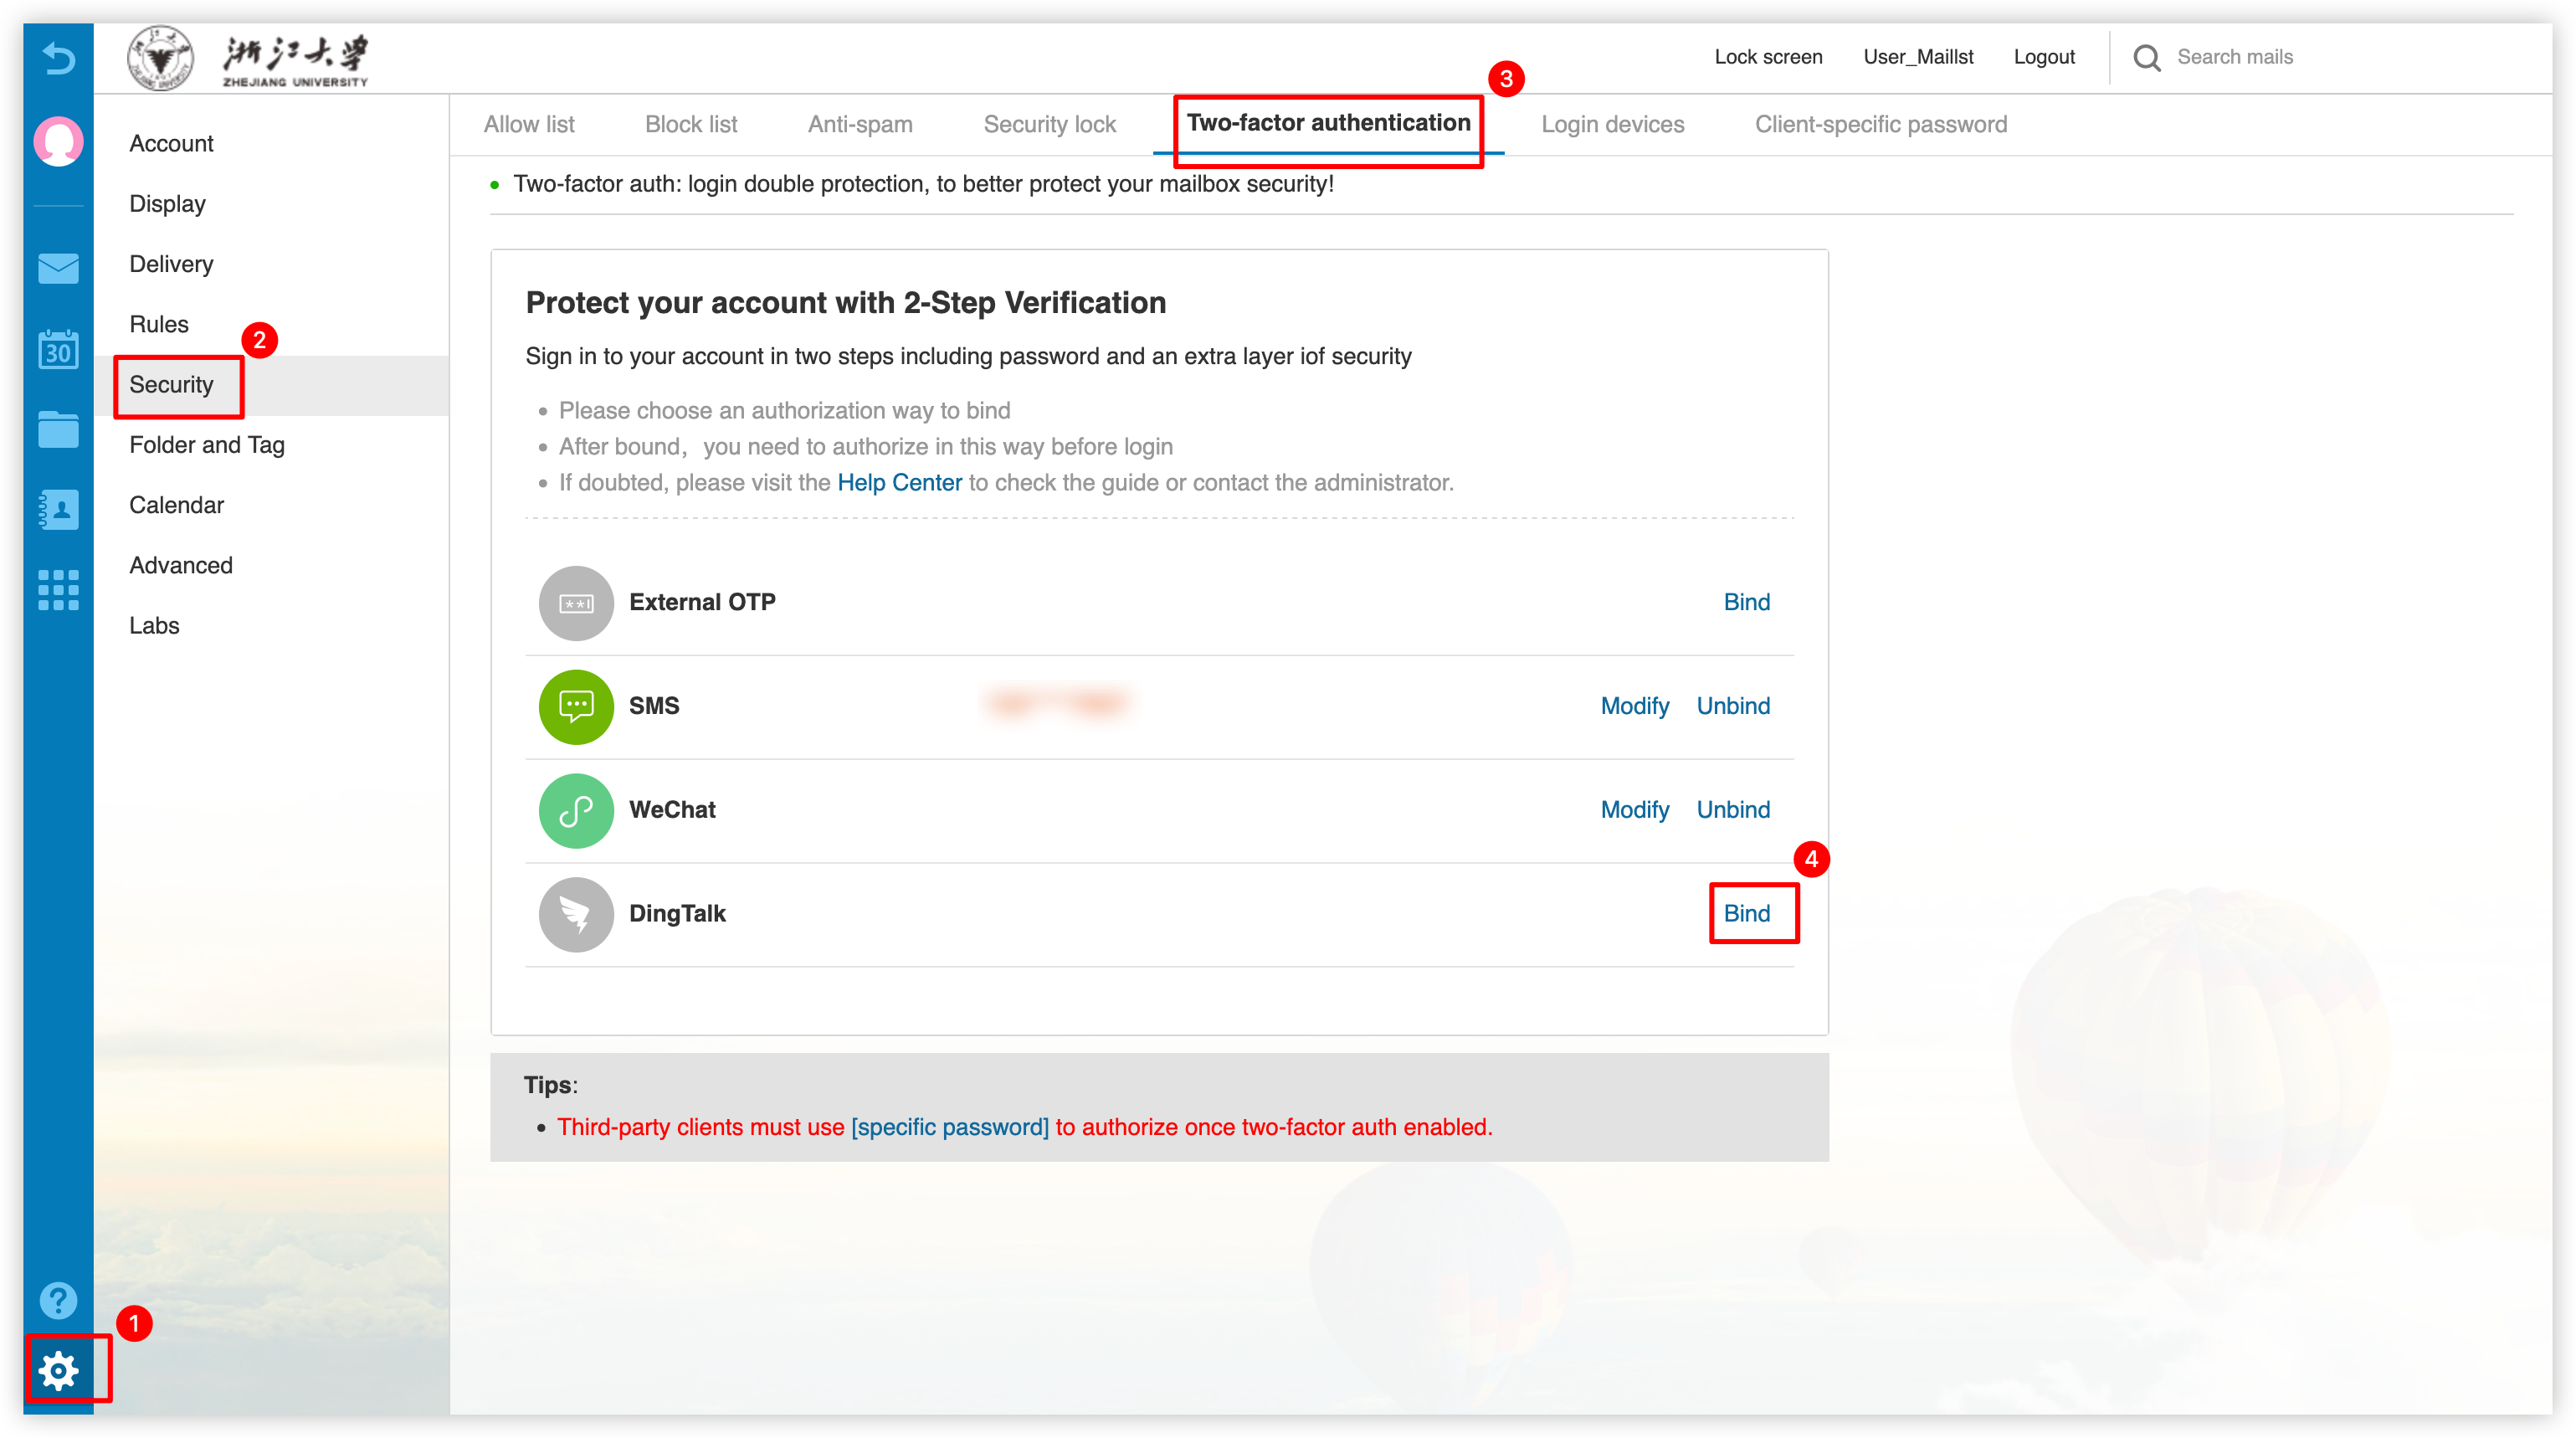
Select Verification Method (Click to Expand for Detailed Setup Steps)
Access the Binding Page
Log in to https://mail.zju.edu.cn and click 「Settings」→「Security」→「Two-factor authentication」to access the binding page, then click 「Bind」 next to “SMS”.
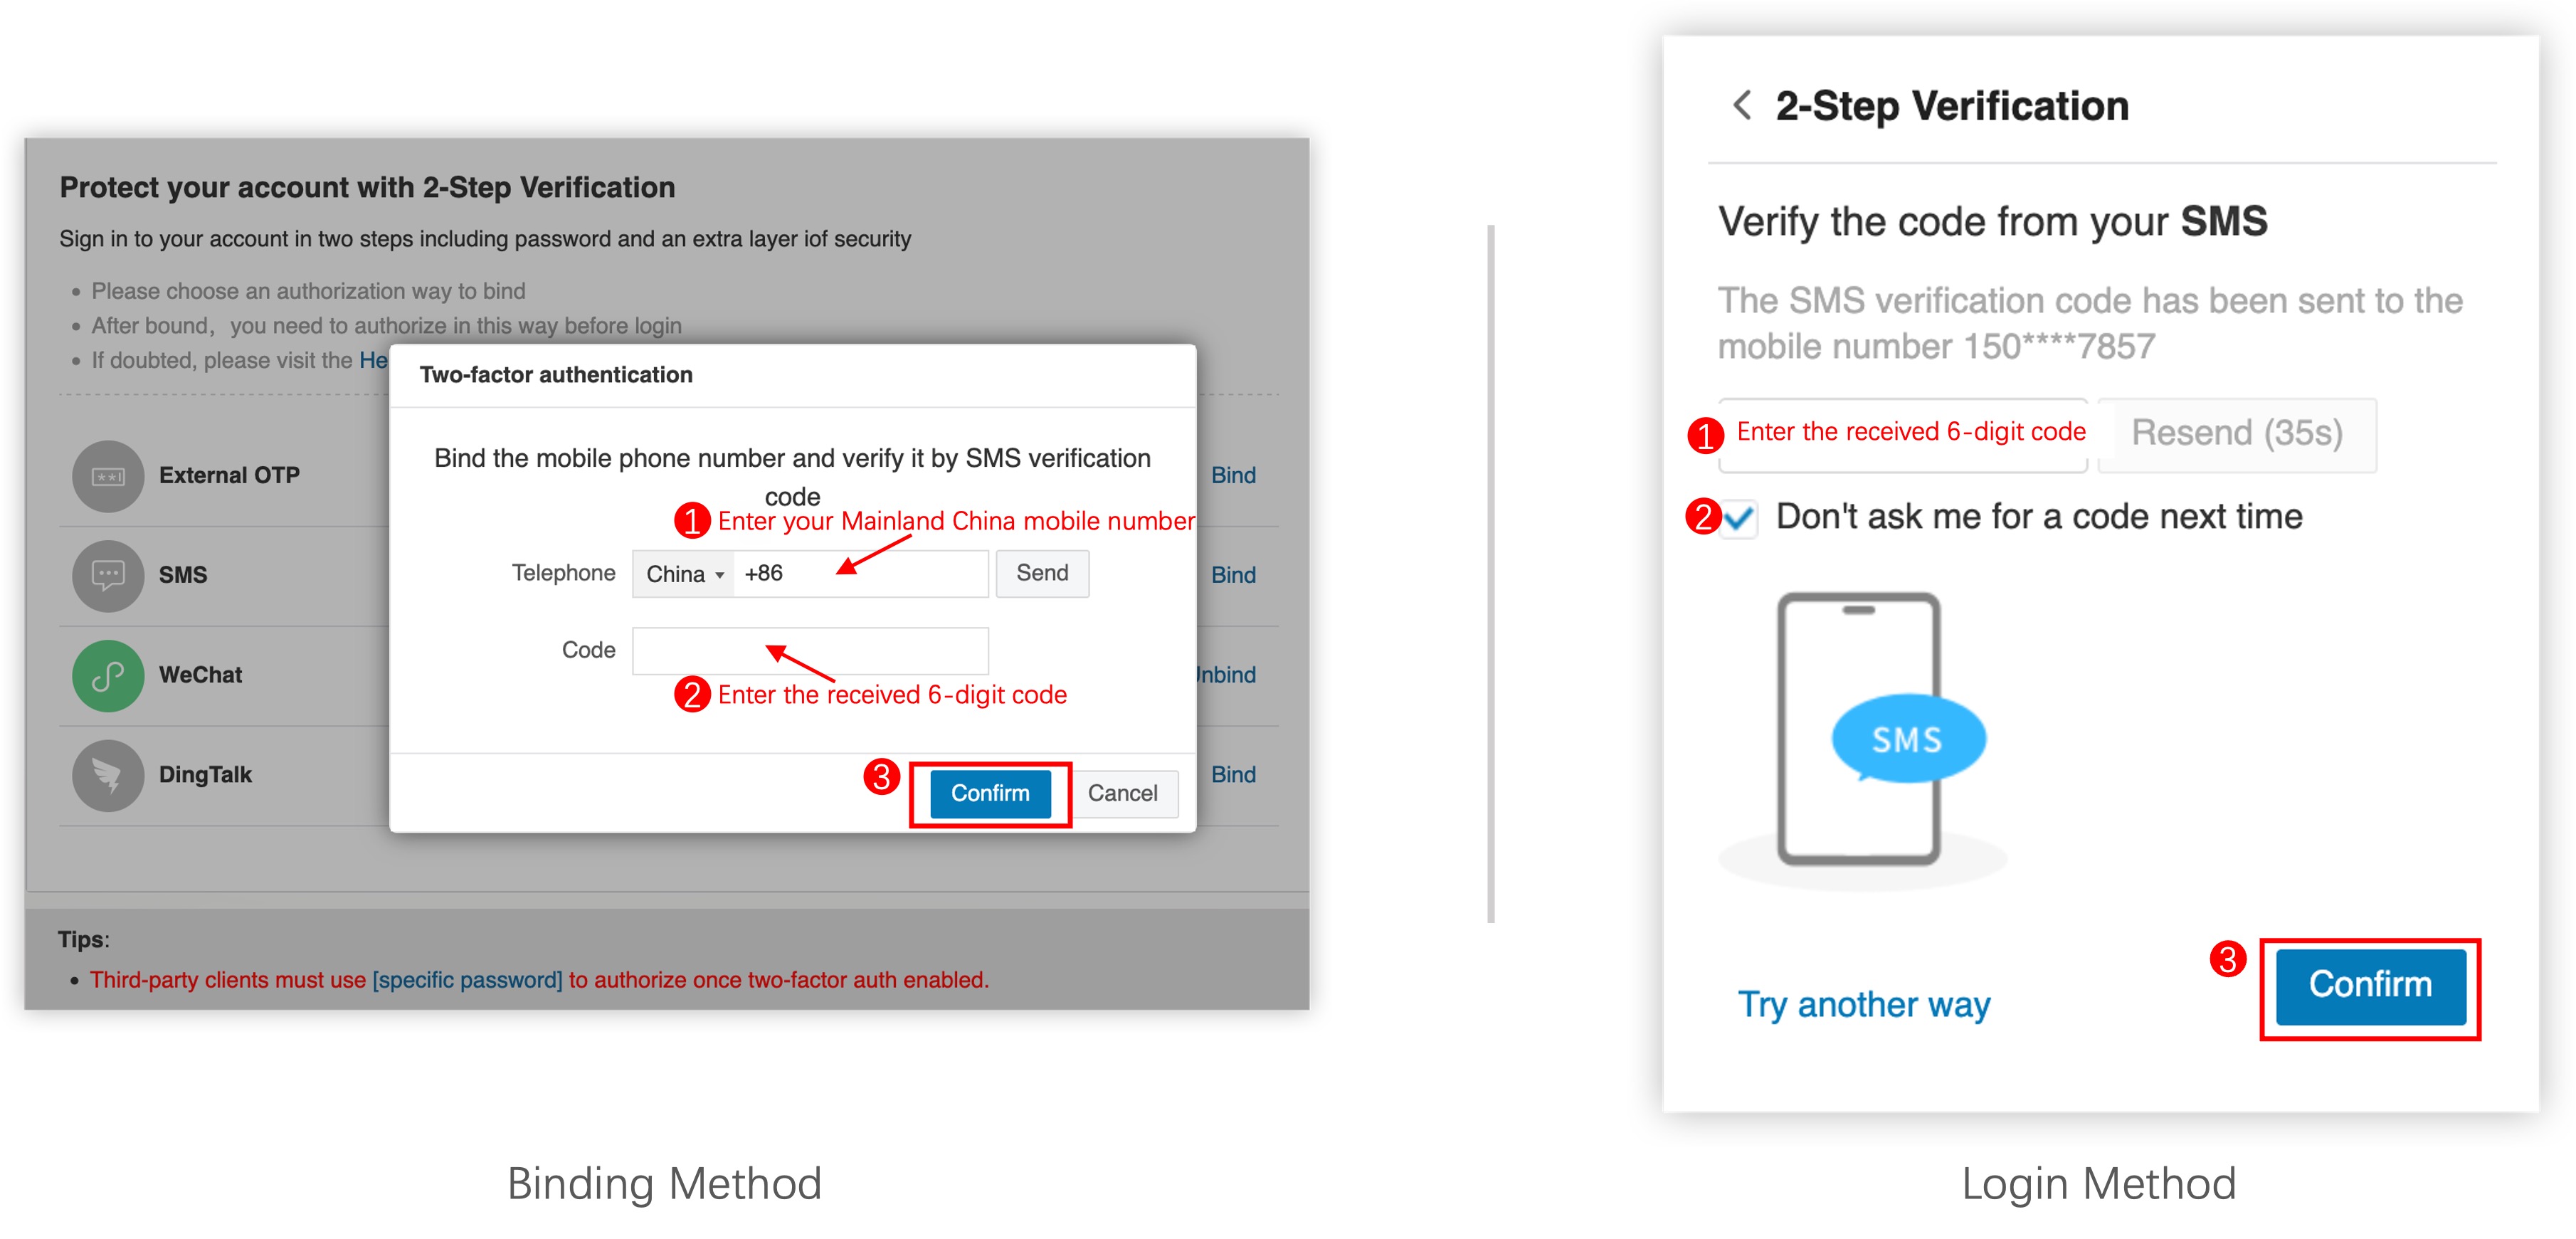
Enter Mobile Number
Enter your Mainland China mobile number into the "Telephone" box in the pop-up window.
Receive and Enter Verification Code
Click "Send", enter the received 6-digit code into the "Code" box, and click "Confirm" to complete mobile binding.
Access the Binding Page
Log in to https://mail.zju.edu.cn and click 「Settings」→「Security」→「Two-factor authentication」to access the binding page, then click 「Bind」 next to "WeChat".
Scan via WeChat
Scan the QR code displayed on the pop-up window using WeChat.
Confirm Binding
Confirm the binding operation in WeChat to complete WeChat account association.
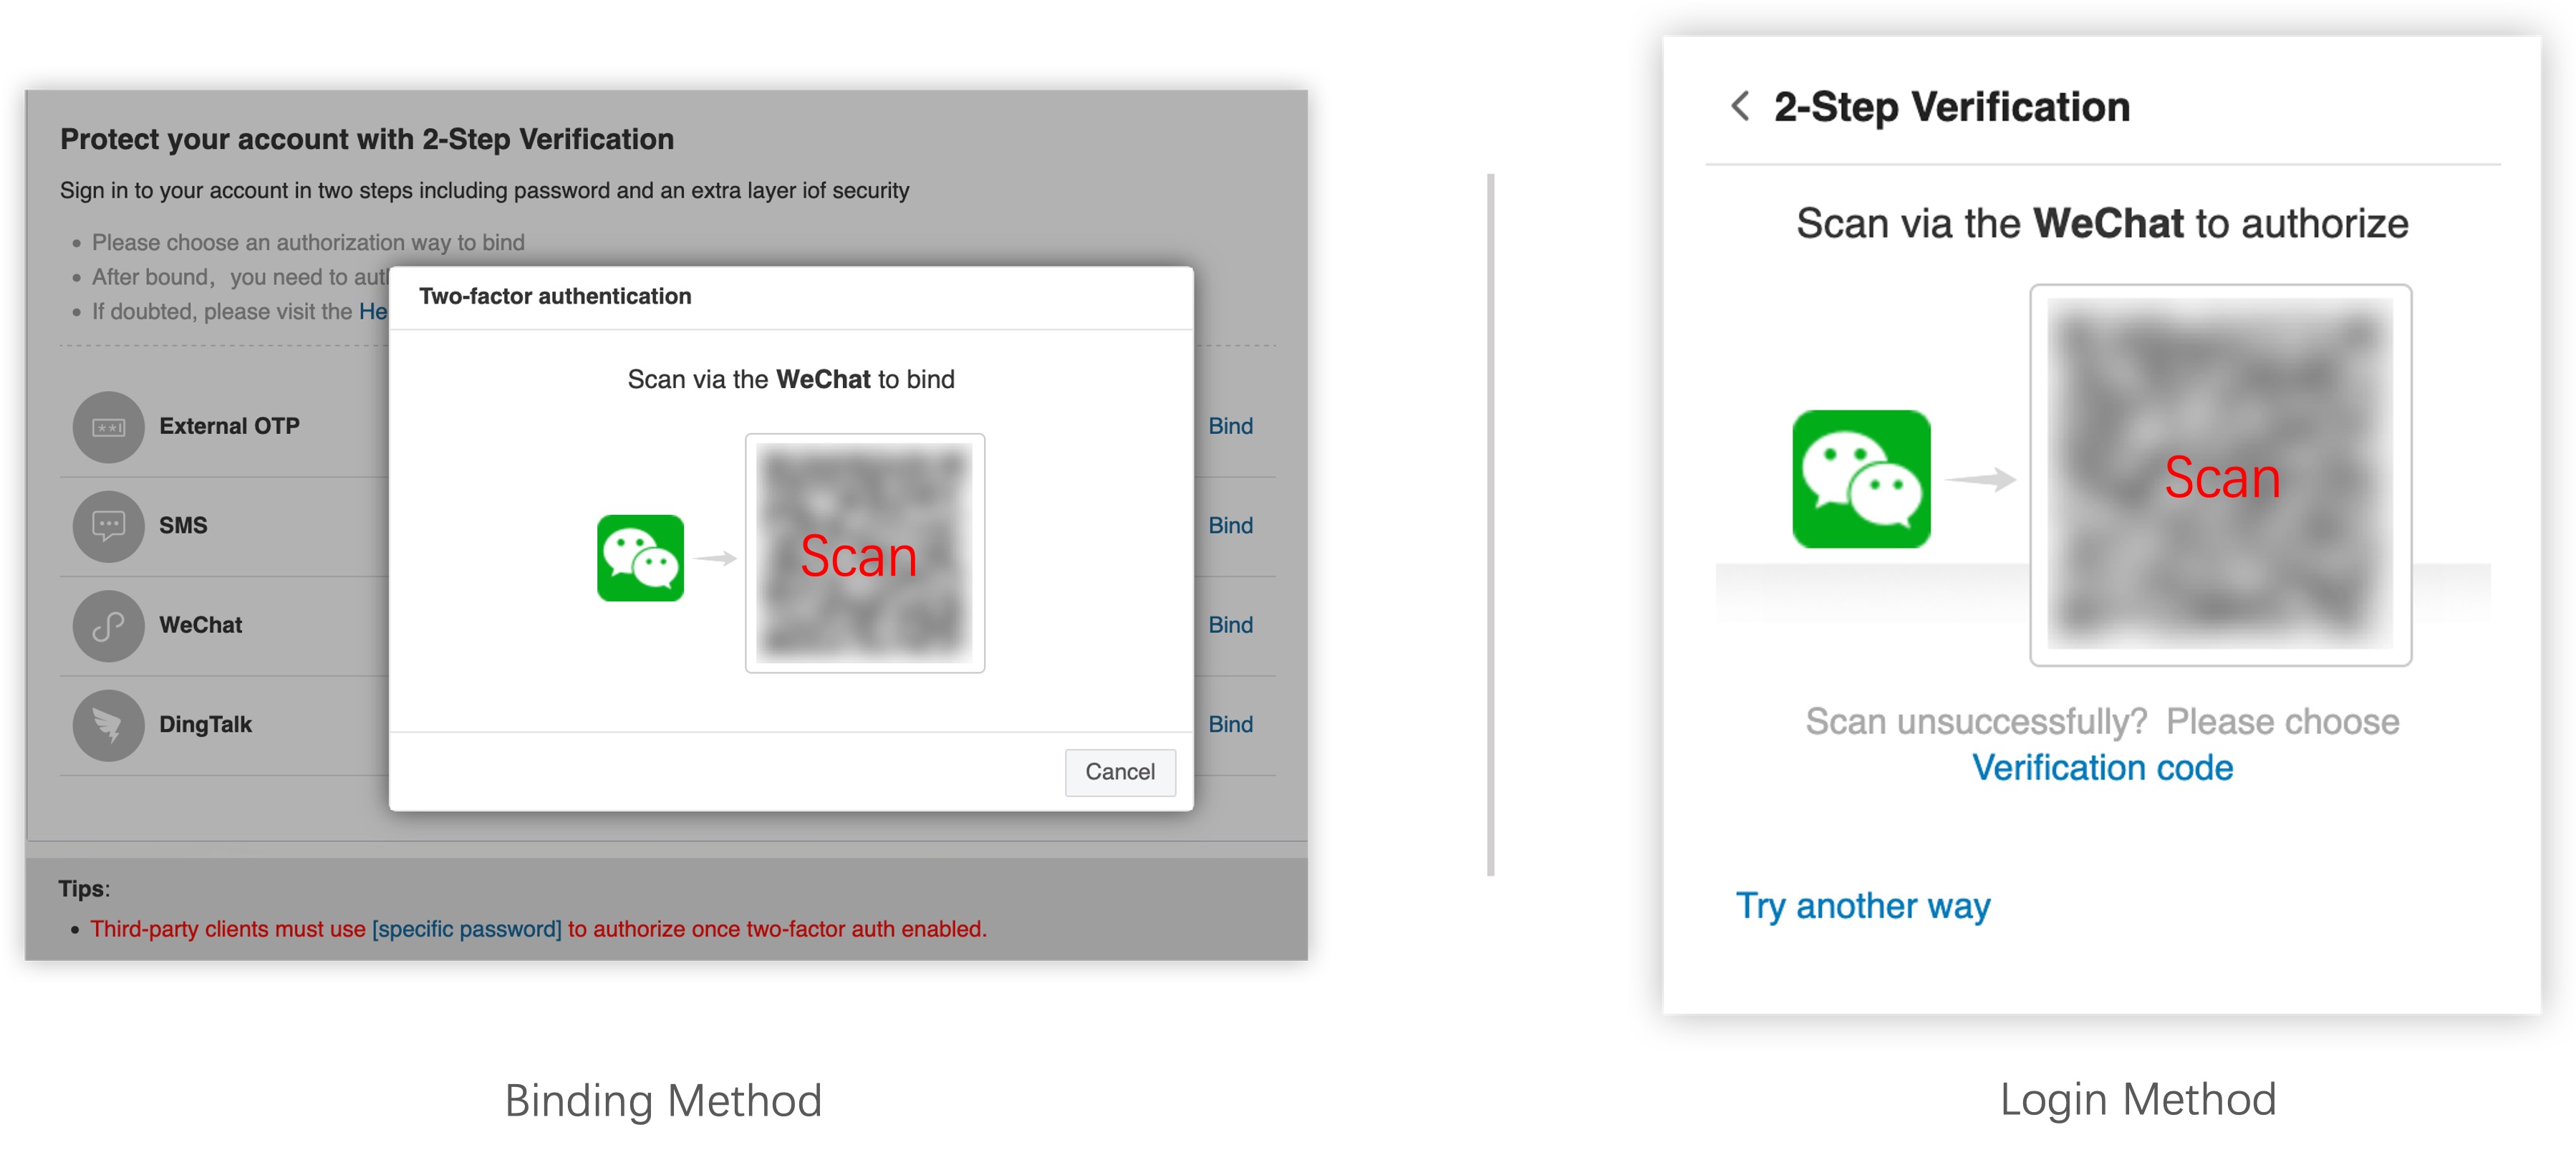
Note: When using WeChat verification, ensure your phone time is completely synchronized with computer time, otherwise verification may fail.
Access the Binding Page
Log in to https://mail.zju.edu.cn and click 「Settings」→「Security」→「Two-factor authentication」to access the binding page, then click 「Bind」 next to "DingTalk".
Scan via ZJU DingTalk
Scan the QR code displayed on the pop-up window using ZJU DingTalk.
Confirm Binding
Confirm the binding operation in ZJU DingTalk to complete ZJU DingTalk account association.

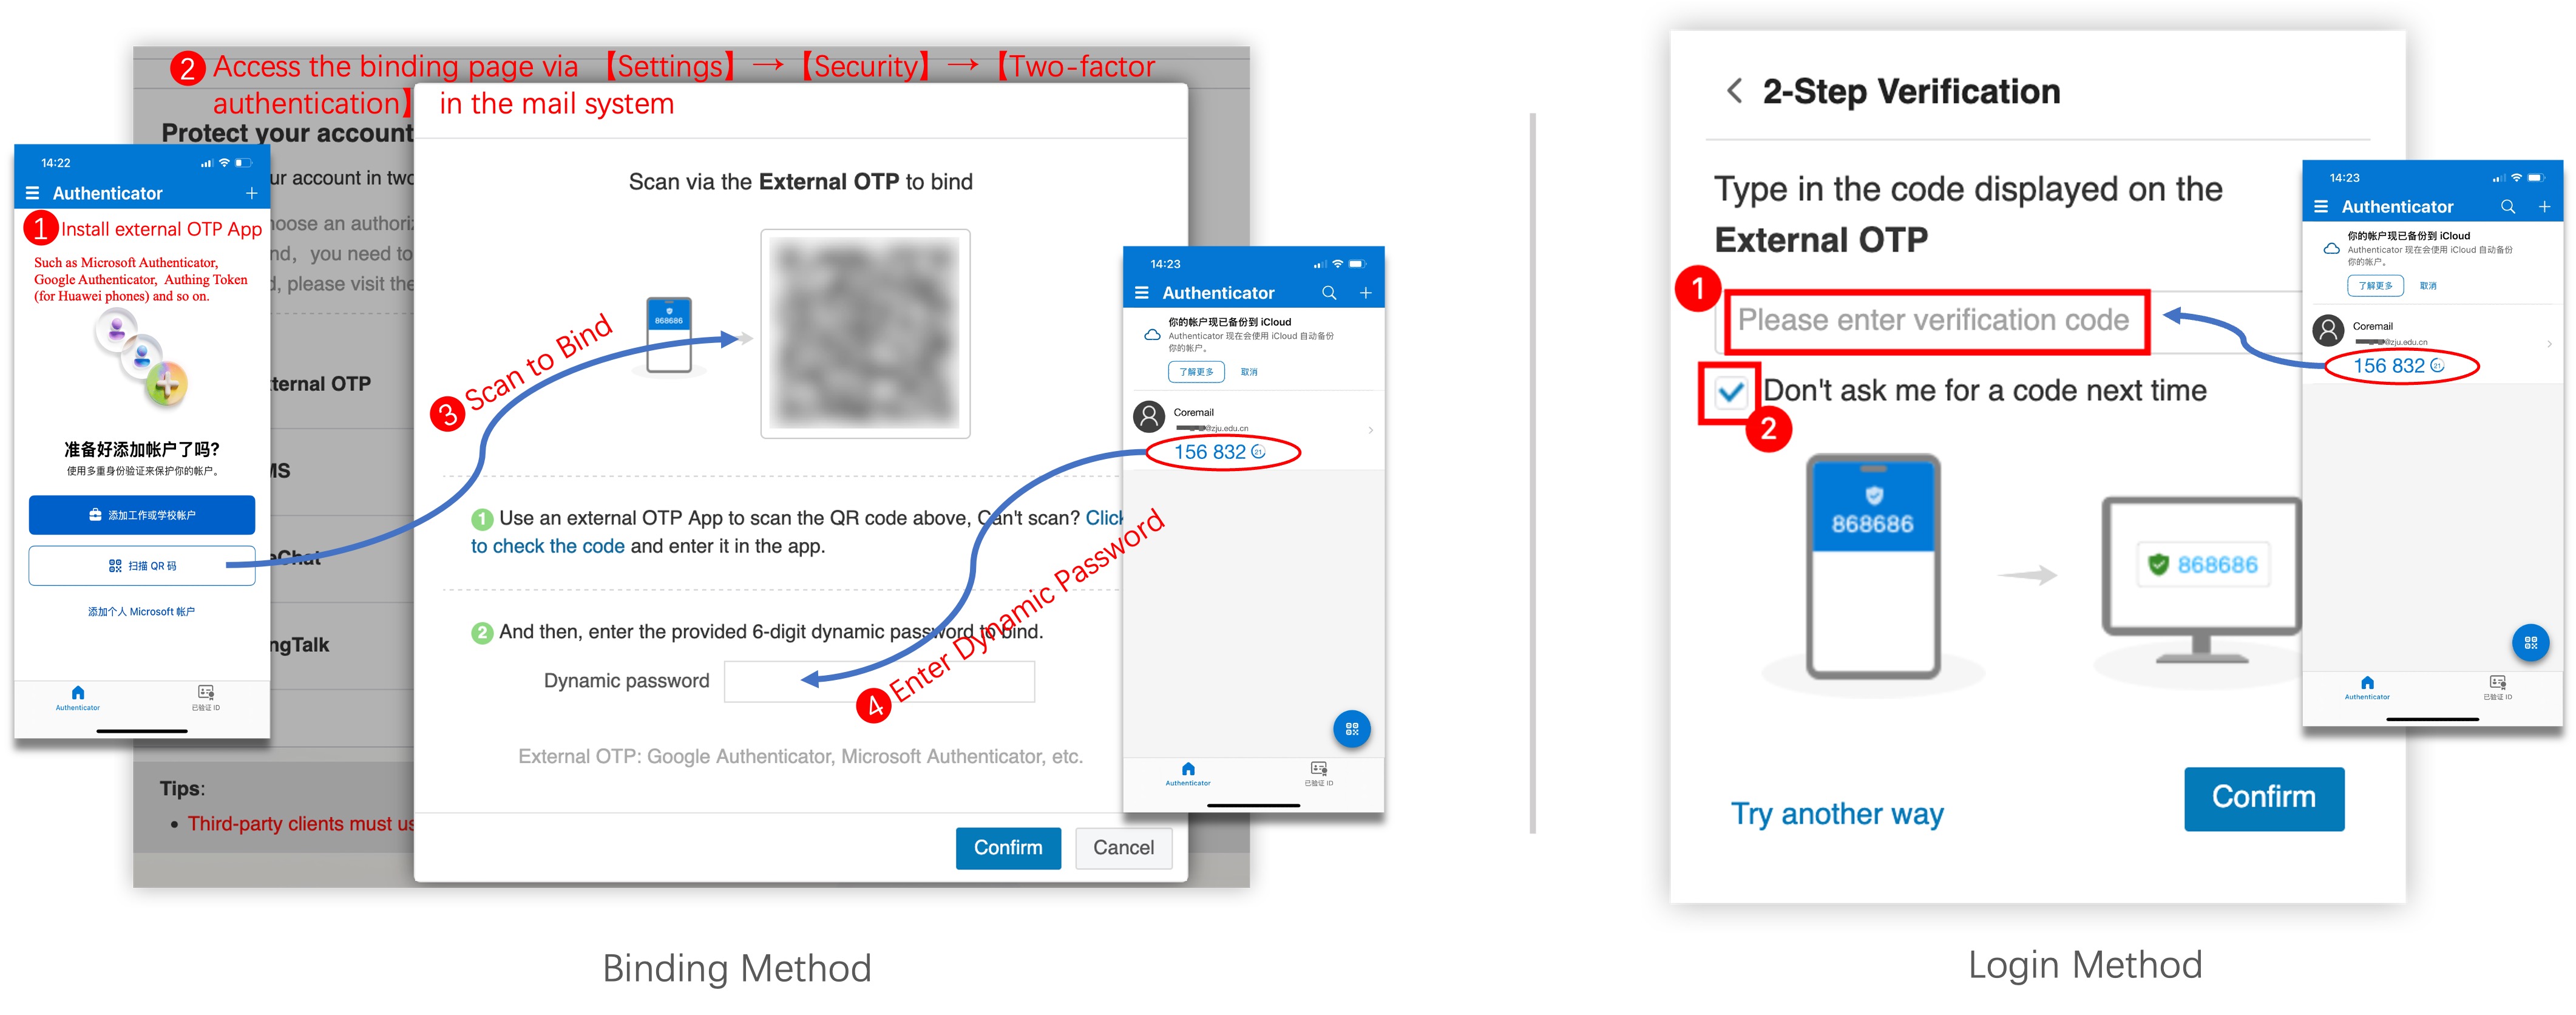
Install OTP App
Install external OTP Apps from your phone's App store, such as Microsoft Authenticator, Google Authenticator, or Authing Token (for Huawei phones) and so on.
Access the Binding Page
Log in to https://mail.zju.edu.cn and click 「Settings」→「Security」→「Two-factor authentication」to access the binding page, then click 「Bind」 next to “External OTP”.
Scan QR Code via OTP App
Scan the QR code displayed on the pop-up window using the OTP App installed in Step 1.
Enter Dynamic Password
Enter the 6-digit dynamic password in the OTP App into the "Dynamic Password" box, and click "Confirm" to complete binding.
Important Notes:
- Shared Accounts: Please properly save a screenshot of the QR code on the binding page for others to scan and bind, enabling multiple simultaneous users.
- Time Synchronization: OTP dynamic passwords are time-based with 1-minute validity. Ensure phone and computer times are completely synchronized.
- Overseas Access: OTP verification has no regional restrictions, no SMS reception needed, suitable for overseas users.
Note: If you only use ZJU Email via web browser and complete the above setup, you can use ZJU Email normally without further steps.
3. How to Setup Client-specific Password?
After enabling two-factor authentication, email clients must use client‑specific password to log in. Please follow the instructions below to setup client-specific password. Email clients include Foxmail, Outlook, built‑in email Apps on phones/computers, etc.
Note: If you continue using original web password in the email client after two-factor authentication is enabled, the client may display an error such as "Account error". Once client‑specific password is configured, the client will work normally.
Generate Client-specific Password
- Log in to Zhejiang University Email System (https://mail.zju.edu.cn) via browser, complete Two-factor Authentication Setup as instructed above.
- Click 「Settings」→「Security」→「Client-specific password」.
- Click 「Generate Specific Password」, enter an identifiable password name (like "Mobile Client Password", "PC Client Password", etc.). Password name is not password!
- Click 「Generate」 button, system will generate a 16-character password randomly. No spaces, Case-sensitive
- Click 「Copy」 button to save client-specific password, as it is shown only once.

Usage of Client-specific Password:
- Client-specific password is 16 characters generated randomly, no spaces, case-sensitive.
- One client-specific password can be used simultaneously on multiple devices.
- Up to 6 client-specific password can be set, convenient for managing different devices.
- If forgotten, you can only delete and regenerate client-specific password.
Setup Client-specific Password in Clients (Click to Expand for Common Client Setup Methods)
- When Foxmail shows "Account Error", enter the generated client-specific password in “Password” box.
- Click 「Setup account」→「Advanced」 to configure servers.
- In the pop-up window, set server address and port, confirm both incoming (IMAP/POP3) and outgoing (SMTP) server passwords are updated to the client-specific password.
- Click 「Done」 and restart the program.

- Click ZJU email account, Outlook report "you need to sign in".
- In the pop-up window, set server address and port, confirm both incoming (IMAP/POP3) and outgoing (SMTP) server passwords are updated to the client-specific password.
- Click 「Continue」 and restart the program.

- When Mail App shows "Can't connect to the account "zju.edu.cn"", enter the generated client-specific password in “Password” box.
- Click 「Settings」→「Accounts」→「Server Settings」.
- Set server address and port, confirm both incoming (IMAP/POP3) and outgoing (SMTP) server passwords are updated to the client-specific password.
- Save settings and restart the program.

- Open 「Email」 App, click top-right 「Settings」→ select ZJU email account →「Server Settings」.
- In the pop-up window, set server address and port, confirm both incoming (IMAP/POP3) and outgoing (SMTP) server passwords are updated to the client-specific password (Huawei phones don't support pasting).
- Click 「Done」 and restart the program.

Note: Huawei Email client does not support password pasting, you need to manually enter the 16-character password (no spaces, case-sensitive).
- When Mail App shows "Unable to receive mail", click phone's 「Settings」→「Apps」→「Mail」→「Mail Accounts」→「zju.edu.cn」→「Account Settings」.
- In the pop-up window, set IMAP account information and incoming mail server (password needs to be client-specific password).
- In 「Account Settings」 page click 「SMTP」, set outgoing mail server address, port and password (needs to be client-specific password), click 「Done」, then return to「Account Settings」 page.
- In 「Account Settings」 page click 「Advanced」, set incoming mail server port, then return to「Account Settings」 page.
- Click 「Done」 and restart the program.

Note: iPhone needs to set both incoming and outgoing server passwords separately. Ensure both are updated to the 16-character client-specific password (no spaces, case-sensitive).
Note:
- If errors still appear after saving the client settings, please check whether you have updated the passwords for both the incoming and outgoing mail servers, and confirm that the client‑specific password is entered correctly (16 characters, no spaces, case‑sensitive).
- If the issue persists, try changing network (switch Wi-Fi/mobile data) or save the settings, exit the client, wait a moment, and log back in.
- If still unresolved, contact Information Technology Center for technical support.
Technical Support
If you encounter any issues while using ZJU Email, please feel free to contact us:
24/7 Service Hotline
Security is everyone's responsibility. Thank you for your understanding and support of ZJU Email!